USB Charger Clock
If the product has a USB Charger Clock cover, then, to adjust the time on the clock, or change its battery, loosen the teeny screw to the side of the clock and remove the clock mechanism. This now can be handled in the same way as a wrist worn watch. The time can be adjusted by the rotary mechanism. The battery can be changed by springing the back open. A jeweller’s shop can assist, if required.
Valve Mono-clock
If the product has a valve mono-clock, then, there will be two buttons to set the clock. It is always easier to do this for a time that has 4 different digits. One button is pushed once for each of the 4 digits, to select the one to be changed. The other button is pushed to step that digit to the required number. The original button is then pushed to step beyond the 4th digit and saved. This clock is battery-backed and keeps time when the power is off.
Bulb Replacement
Please read the customer safety section.
Light bulbs do not last forever, and at some time in the future you may be purchasing a replacement bulb. Please ensure that the correct buld type is fitted. Lamps with a mains dimmer should only use a filament bulb. A large screw base is "E27" and typically requires a 40W bulbe. A small screw base is "E14" and typically requires 25W.
Switched lamps (without dimmer) may use filament, LED or candle-effect bulb at the required voltage. Our low voltage range will normally require a 12v bulb.
Stereo Unit Instructions
This unit has the three primary modes :
- FM Radio
- Internal microSD card
- Extermal USB memory
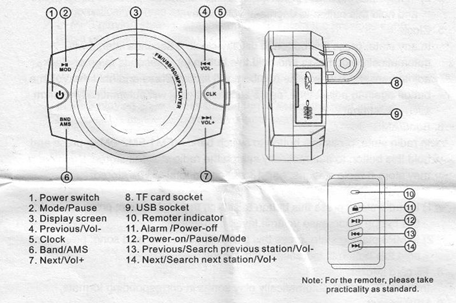
These primary modes are controlled by the front panel below :

The “buttons” on the control panel operate with finger contact. Please note that “Touch” refers to momentary finger contact and “Hold” refers to a slightly longer contact.
|
Item |
Name |
Mode |
Action |
|
1 |
Power Switch |
Powered Off |
Touch to Power On |
|
|
|
Powered On |
Hold to Power Off |
|
|
|
|
|
|
2 |
Mode / Pause (>II) |
Radio or MP3 playing |
Touch to pause output Touch again to resume Hold to switch primary mode |
|
|
|
|
|
|
3 |
Display Screen |
Radio |
FM Frequency |
|
|
|
MP3 |
Track number and run time |
|
|
|
|
|
|
4 |
Previous / Vol- (I<<) |
Any |
Hold to lower volume |
|
|
|
Radio |
Go to previous radio station |
|
|
|
MP3 |
Go to previous track |
|
|
|
|
|
|
5 |
Clock |
Any |
Touch to display clock Hold, when clock displayed, to set clock. Use I<< and >>I controls to set hours. Touch Clock again. Use I<< and >>I controls to set minutes. Touch Clock again |
|
|
|
|
|
|
6 |
Band / AMS |
Radio |
Touch to step to next FM band (FM1, FM2 and FM3). Hold to rescan for FM channels. Be sure to deploy the FM aerial wire at the rear for this action. The discovered stations will be stored, up to 6 stations per FM band. |
|
|
|
|
|
|
7 |
Next / Vol+ (>>I) |
Any |
Hold to raise volume |
|
|
|
Radio |
Go to next radio station |
|
|
|
MP3 |
Go to next track |
|
|
|
|
|
|
|
Sockets (on right) |
|
These hold the media for MP3 modes |
|
8 |
TF card socket (microSD) |
|
Insert card into slot. Tracks will be played in file order from main directory. |
|
|
|
|
|
|
9 |
USB Socket |
|
This is a mini 5 USB socket. An adaptor cable is included to facilitate USB 2.0 memory sticks. Tracks will be played in file order from main directory. |
|
|
|
|
|
|
|
Remote Control (wireless) |
|
|
|
10 |
Remote Signal |
|
Flickers when remote control button is selected |
|
11 |
Alarm / Power Off |
|
Press to set motion alarm (1 beep) Press again to clear motion alarm (2 beeps) |
|
|
|
Radio Mode |
Hold to power off |
|
|
|
|
|
|
12 |
Power On / Pause Mode |
Powered off |
Press to Power on |
|
|
|
Any |
Press to pause. Press again to Resume |
|
|
|
|
Hold to switch Primary Mode |
|
|
|
|
|
|
13 |
Previous / Vol- |
Any |
Hold to lower volume |
|
|
|
Radio |
Press to step to previous station |
|
|
|
MP3 |
Press to step to previous track |
|
14 |
Next / Vol+ |
Any |
Hold to raise volume |
|
|
|
Radio |
Press to step to next station |
|
|
|
MP3 |
Press to step to next track |